

Most shooters think of zeroing as a quick step before the real training begins. A few shots, a few adjustments, and you're ready to go.
That approach works well on a live range, where the relationship between your rifle, optic, and target has already been established.
Indoor long-range training is different.
Before F-Class Laser Academy can accurately recreate bullet flight at 300, 600, or even 1,000 yards, it must first verify the mechanical and optical relationship between your rifle, laser cartridge, scope, and the recreated indoor firing range.
As F-Class Laser Academy evolved, Laser Zeroing became much more than simply aligning a laser to your point of aim. Today, it combines three independent verification steps that work together to build a repeatable and trustworthy training environment.
The good news is that most of these verification steps are completed only once during your daily setup.
Let's look at what is actually happening behind the scenes.
Step 1. Temporary Indoor Zero
This step is unique to indoor precision rifle training.
Your outdoor zero should remain exactly as it is. Instead of changing your confirmed live-fire zero, establish a temporary indoor zero for your current indoor setup.
Minimize your scope magnification to locate your first laser shot on the target.
Observe where the shot registers. Because the firing line is established at only 8 yards, the initial point of impact will typically appear well below the target center. This is expected and simply reflects the difference between your live-fire zero distance and the much shorter indoor firing distance.
Adjust your scope's elevation and windage during the first few shots. Once the laser impacts are on the target, return your scope to the magnification you intend to use during training and continue fine-tuning until repeated shots consistently strike your intended point of aim.
Record your indoor turret settings if you plan to use the same rifle and indoor setup again. Having a recorded indoor zero allows you to return to the same configuration quickly for future training sessions.
Although this temporary indoor zero is highly repeatable, it is never guaranteed to be identical after every cartridge insertion. The final position of the laser cartridge is influenced by normal firearm tolerances, cartridge seating, bolt lock-up, extractor engagement, and other mechanical characteristics unique to your rifle.
LaserHIT cartridges use two precision O-rings to help stabilize and center the cartridge inside the chamber. Keep the O-rings clean and lightly lubricated with gun oil so the cartridge seats smoothly and consistently. For the best repeatability, always insert the laser cartridge in the same orientation. These simple habits minimize the amount of fine-tuning required after reinserting the cartridge.
Whenever the cartridge is removed and reinserted, verify your temporary indoor zero before beginning the next training session.
This temporary indoor zero is intended for indoor training only. Before returning to live-fire shooting, always restore your original turret settings or confirm your outdoor zero at the range.
Step 2. Verify the Indoor Firing-Line Distance
Establishing a Temporary Indoor Zero is only the first part of the setup.
Before advancing to ballistic training, you should also verify that your actual indoor firing-line distance matches the recreated firing geometry used by F-Class Laser Academy. Even moving the rifle a few inches forward or backward changes the recreated ballistic solution.
This verification is performed before the app's Laser Zeroing and serves a different purpose. Rather than measuring laser alignment, it confirms that your rifle is positioned at the correct distance from the target for accurate long-range recreation.
The verification method depends on the type of scope you use.
First Focal Plane (FFP) Scopes
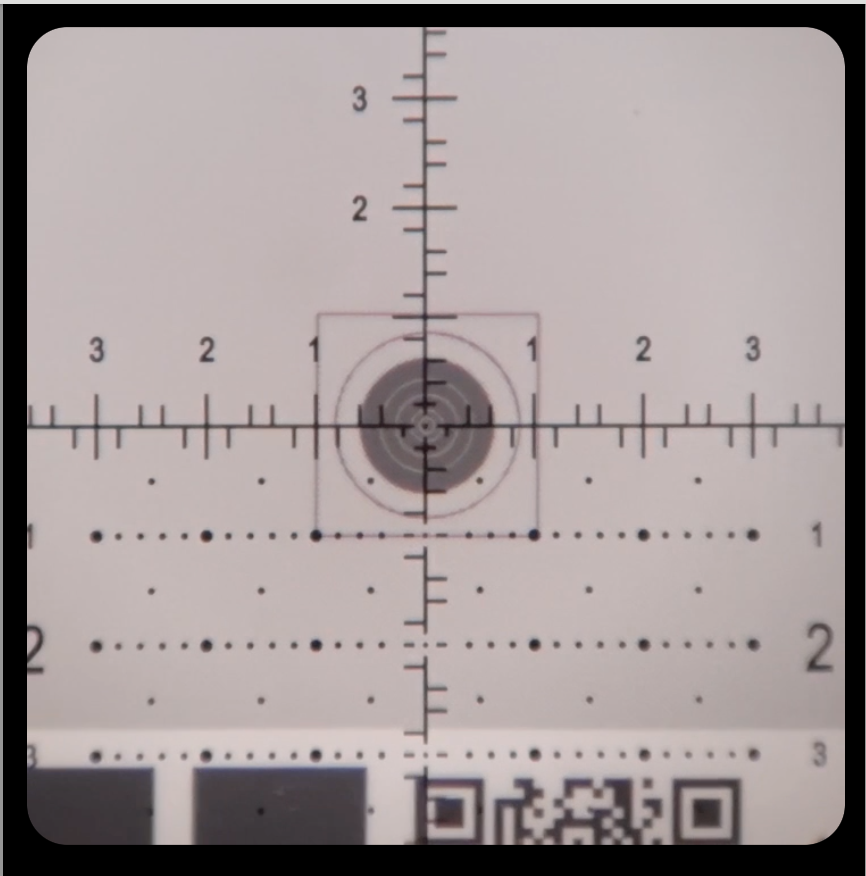
F-Class Laser Academy's printed reference reticles were designed primarily for First Focal Plane (FFP) scopes.
In an FFP scope, the reticle grows and shrinks with the target image as magnification changes while maintaining the same angular subtensions. This allows you to adjust the scope magnification until the printed reference reticles and your scope reticle can be compared easily.

You do not need to see the entire reference scale. Whether you align the full 20 MOA scale, the 10 MOA section, or another visible portion of the reference, the result is the same. The important point is that the angular spacing of your reticle matches the corresponding printed reference.
If the reticles align, your firing-line distance is correct.
If your reticle appears below the printed reference, the rifle is positioned too far from the target. Move it slightly forward.
If your reticle appears above the printed reference, the rifle is too close. Move it slightly backward.
Make only small adjustments until the reticles align.
(Image: Scope view showing correct alignment with the printed reference reticles.)
Second Focal Plane (SFP) Scopes
Many F-Class shooters prefer high-magnification Second Focal Plane (SFP) scopes.
In an SFP scope, the reticle remains the same apparent size while the target image changes as magnification changes. Although reticle subtensions are accurate at the scope's calibrated magnification, different reticle designs and hash-mark spacing can make the printed reference reticles less practical for verifying the indoor firing-line distance.
To simplify the process, F-Class Laser Academy provides an alternative verification method based on the known dimensions of the target itself.
As an example, we'll use the LRFC-L1 1000-yard target. At the correct 25-foot firing-line distance, the outside 6-ring subtends exactly 6 MOA.
Set your scope to the maximum magnification you intend to use during training. Compare your reticle with the height of the outside 6-ring.
If the two match, your firing-line distance is correct.
If the reticle appears below the outside ring, you are too far from the target. Move the rifle slightly forward.
If the reticle appears above the outside ring, you are too close. Move the rifle slightly backward.
Make only small adjustments. Even moving the rifle a few inches changes the recreated firing geometry.
The same principle applies to every F-Class target included with the system. Each target has been recreated from the original NRA dimensions and subtends known angular values at the correct indoor firing-line distance.
Once the correct position has been established, use a bench stop, floor marker, or another repeatable reference so the rifle returns to the same firing-line position for future training sessions. You may also make it a habit to quickly verify the reticle alignment before each Stage.
(Image: Annotated LRFC-L1 illustration showing the outside 6-ring subtending 6 MOA.)
Step 3. Software Laser Zeroing
Once your Temporary Indoor Zero and firing-line geometry have been verified, Laser Zeroing inside the F-Class Laser Academy app begins.
This step serves a different purpose.
Rather than establishing your indoor zero, the app verifies the final alignment between your point of aim and the laser impact. A Virtual Spotter provides immediate windage and elevation guidance, helping you refine your shots toward the center of the target.

You have up to 20 attempts to complete the process.
The objective is not simply to fire 20 shots. The goal is to produce a consistent, tight group measuring no more than approximately 0.5 MOA. Once this level of precision has been achieved, the app confirms the Laser Zero and establishes the reference used throughout the remainder of your training session.
Think of this as your first qualification.

Before introducing bullet drop, wind drift, and ballistic calculations, you should first demonstrate that you can consistently place shots where you intend under ideal conditions. With no external ballistics involved, every shot reflects only your rifle setup, shooting fundamentals, and trigger control.
If you cannot consistently achieve the required group size, the software is telling you something valuable. Rather than immediately moving to longer practicing distances, spend more time building consistency or begin with a shorter training distance, such as the 300-yard target. Once you can repeatedly confirm precise shot placement under controlled conditions, you are ready to introduce external ballistics and progressively greater challenges.
Laser Zeroing is therefore more than a setup procedure. It is the foundation upon which every ballistic calculation and every future training Stage depends.
Ballistics Comes Later
After your first 120 saved shots, Levels 2 through 5 unlock.
This is where external ballistics become part of the training.
Laser Zeroing does not calculate bullet drop.
It simply provides the precise mechanical reference that allows the ballistic engine to interpret your shots correctly.
Once the laser alignment has been verified, the software combines that information with your selected rifle profile, ballistic solution, environmental conditions, recreated distance, and wind shifts to modeling realistic long-range bullet flight.
At this stage, you are no longer learning mechanical consistency.
You are learning to apply elevation, manage wind, confirm your DOPE, and make the same decisions required during live F-Class competition.
Why Three Separate Steps?
Although they happen during the same setup process, these three procedures solve completely different problems.
Mechanical Zeroing verifies the repeatable relationship between your firearm and the laser cartridge.
Firing-Line Geometry Verification confirms that your indoor setup accurately recreates the intended long-range target geometry.
Software Laser Zeroing measures the final alignment needed for the ballistic engine to interpret every shot with precision.
Together, these three layers create a training environment that remains consistent from one session to the next.
Where Are Levels 2 Through 5?
A common question from new users is, "Where are the ballistic Levels 2 through 5? I don't see them."
This is intentional.
Every shooter begins at Level 1. The first 120 saved shots are used to build a solid foundation of precision before introducing external ballistics and wind. These 120 shots may be completed across any combination of FCLA target distances.
Once 120 qualifying shots have been saved, the Stage Settings panel becomes available for every F-Class Laser Academy target. Tap the Stage Settings panel to open the Difficulty Level table, where you can select Levels 2 through 5 and review the complete Stage configuration for each level.
Level 1 remains available at all times, allowing you to return to flat-trajectory practice whenever you want to refine your fundamentals.
(Image: Stage Selection screen highlighting the Stage Settings panel before and after unlocking Levels 2-5.)
Last Word
The more realistic the F-Class Laser academy match becomes, the more important proper setup becomes.
Laser Zeroing is no longer just a calibration step. It is a verification process that combines firearm mechanics, optical geometry, and software intelligence into a single, repeatable workflow.
Take a few extra minutes to complete it carefully.
When your rifle, scope, laser cartridge, firing-line geometry, and software all agree with one another, you stop questioning the equipment and can focus entirely on what matters most: executing the next shot.
Share:
How to Start: A Practical Guide for Your First Session